Diy Easy to Make Evil Queen White Collar
Homecoming Week! Good vs. Evil! Freshman/Sophomores dress as the "Good" . . .Juniors and Seniors represent the "Evil".
At first I thought Malificent . . but . . . after Googling "Evil Characters" or something like that, I found the Evil Queen from Snow White. Who wouldn't want to walk around offering bites of an apple in a creepy voice?
I started with a Google search (I do not own this image . . . source website is listed in the caption):
I looked at multiple images from the iconic movie, as well as lots of costumes–both commercial and created. Typically she wears a very simple, but somewhat large, gold crown. She has the black head covering and cape, with a large white collar. The dress is a purple or blue, ideally with large open sleeves with white trim. She accessorizes with a red brooch and a red sash.
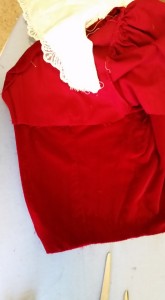
THE DRESS:
I rummaged through my stash of dresses, and found this purple bridesmaid dress. It basically fit my daughter. It was a bit snug, and a bit long . . but those are problem easily solved. We measured how much shorter the dress needed to be. I marked that line with pins:


When I have someone try something on, I mark the "shortening" line with safety pins. I am assured that these will NOT come out as I am moving the dress. I then measure that distance, and put the rest of the pins in. Depending on the project, sometimes I will cut along this line and sometimes sew. In this case, I wanted to keep the lining attached to the skirt, so I basted the skirt and lining together before cutting the skirt off.

Next, I cut the skirt off ABOVE the stitching line. I cut down and around the zipper.


Another option (described in one of the 1950's upcycle post here) is to bring the skirt fabric UP to the waistline and pleat it to size, and topstich. However, since I knew I needed to add fabric to the bodice to make if fit, and I was planning on using the piece between the cut line and the waist, I opted to do it this way.
However, once I got this far, and opened the inside of the bodice up . . . I was pleasantly surprised.

The bodice itself was constructed of the satin fashion fabric completely lined with the lightweight white fabric interfacing. The purple lining was completely separate–attached at the neckline, sleeve edges and tacked down at the waist. When I clipped the tacking threads at the waist, I was more than pleased to find very generous seams at the sides.

By opening these seams up, I gained about 1/2″ on each piece, or about 2″ over-all between the two sides, which was MORE than enough for the ease that we needed around the waist/torso. This reinforced to me, that the FIRST thing I should have done was look at the inside of the dress and assess the construction details on the inside. I would have been pretty unhappy had I done a more complicated, time-consuming alteration, when I had plenty of fabric right there. What is interesting, is while there is plenty of fabric in the dress itself (bodice and skirt) to alter and provide ease, the waist detailing does not have any extra. This isn't a problem for me, since I don't care, but, if you wanted to alter it for the original purpose, you would not have been able to do it this way. There also was a fair amount of fabric on one side of the zipper. If this had not been enough, I would have taken out the top half of the zipper and narrowed those seams.
I opened all of the layers: fashion fabric, white lining and purple lining up to the level of the underarm and sewed them back together. I did not have to adjust the skirt because the original skirt had a slight gore at the top, and so by removing those 4″, I had enough fabric to cover the now-enlarged bodice.

When it was put back together, there is a little gap in the waist detailing on each side . . . but for a costume, this is not an issue.

The next step was to reattach the skirt. The waist detailing provided a nice little cover-up for the top of the skirt, so I could just sew it on. I did make two little pleats in symmetrical areas on the front to compensate for the skirt being slightly larger than the waistline. In the back, I folded and adjusted the fabric around the zipper. Eventually I made a small bar tack in the back seam to hold the zipper in place.

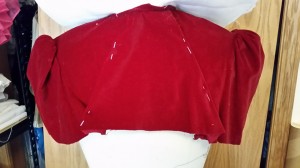
This is the altered dress at this point:


The next step was the sleeves. I had picked another purple satin dress that was a very similar color.
 \
\
It had a full gored skirt, and an almost-full black lining. It appeared to be handmade, based on the inside seams, although the bottom of the lining was serged (but not the skirt seams) so, I wasn't completely sure. I planned on using this to make the full bell-shaped sleeves.
I had this "brilliant" idea to sew the bottom of the lining to the bottom of the skirt as my first step. That was great. Except, I was "off" by a gore and so it twisted. I ripped that all out. Then I did it again (can I defend myself by saying I was fighting a nasty virus during this project, so maybe my mind wasn't all in my head???). Only to figure out that the bottom of the lining was about 1″ smaller than the bottom of the dress . . .so they didn't some out even. My delusional mind said "Who care? It's only a sleeve, it'll be fine".
The next thing I did was take the zipper out of the back, and cut the skirt off the bodice. As long as I'd opened that back seam up that far, I thought, might as well open it up the rest of the way and divide the dress up that way. I then folded the dress in half and cut up THE CENTER FRONT.
As I was doing it, I sort of thought "oops". I mean, seriously, what was I thinking? The center front and center back are going to have the best straight-of-grain pieces of fabric. Ideally, I would have wanted those two places to be the folds and the center of the sleeve pieces . . . not some weird bias-y spot on the sides of the skirt. But . . . once I"d cut up the center front, I thought "screw it" and just kept going.
At this point I had two pieces of material that didn't match up well on the insides and were kind of off-grain.

The original dress had a small cap sleeve, and so it was going to be super easy to attach these sleeves. I measured how big the sleeve opening was on the dress.

I then figured out about how long I would want the finished sleeve to be. I folded in half (sort of, in a off-grain twisted sort of way) the skirt pieces, measured up about 20″ plus a seam allowance along the fold. At that point, I measured about 7″ out into the skirt and marked it with a pin. I then pinned along the angle between that pin and the bottom edge of the skirt to make the widest part of the sleeve opening.

I then folded the second piece in half, used the first sleeve as the pattern, and cut out the second sleeve.

In all honesty . . . up to this point, I made a WHOLE lot more work for myself than I should have. It would have been much easier to not sew the lining to the skirt in the first place, and just cut the sleeve pieces and the lining separately and sew them together at this point. And now I had twisty, poorly matching, weird grain sleeves. (I also wasted a TON of fabric making these sleeves . . I don't know what I'd have used it for otherwise, but, I was not very efficient.)
I opened the sleeve up so that the purple was by the purple (right sides together) and the black was by the black (right sides together) and I sewed it up into a tube. I had to "fudge" the area where I had previously sewn the lining to the skirt bottom.

I then turned the black back to the inside of the purple, and it was now lining again and no rough edges were showing. THAT part worked.

I pinned the top sleeve opening together, and trimmed it as best I could. I ran a row of basting thread around at the seam line, and then finished the top edge with a zig-zag.
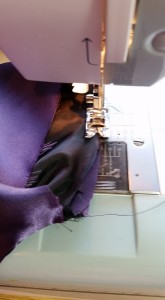
I next pinned it into the sleeve opening (right side to wrong side) and stitched it in.

I purchased some cheap fur from a craft store. My appreciation for how much fake fur costs has increased as I went around and priced fur. This will definitely affect how much I think I might pay for a thrift store garment made of fur/with fur on it.
I cut 3″ strips.

First I sewed the fur to the bottom edge of the sleeve. The top edge was a bit smaller, so I made tiny pleats as I was sewing it on. You can see from the next picture that the sleeves do not hang well. However, when you are wearing it, this is much less noticeable. I have already conceded these sleeves were not my shiny spot of glory, LOL.

The Evil Queen has a black top to her dress. It would be super easy to just wear a long sleeved black t-shirt or compression-type shirt underneath. My daughter needed to wear this to school, so I didn't want it to be too hot (knowing it would also have a cape).
I used the black velour skirt I had started to cut up for the Merida dress, and had actually used for the hood. I took the elastic out of the waistband of the skirt, sewed up the hole a little bit and tried to fit it to the top of the dress.

I messed around shaping the shoulders a bit and trying to figure out the neckline. Originally I had this thought of running an elastic or something around (you can see the two holes from the original tie at the waist of the skirt).

As I was messing around, trying to figure out exactly where to sew it to the neckline, I came up with the idea of making it a separate piece. That way, if you wanted the dress for something else, it wouldn't have to have the black top. That also eliminated trying to guess exactly where that slightly off-the-shoulder purple dress would really want to sit. I cut off the bottom of the skirt roughly evenly, and then cut slits where the arms would be. I sewed small underarm seams. When my daughter tried it on, I further cut the fabric to allow it to stretch around her arms. Since this was a stretch velour, not only did it stretch, but it also doesn't ravel so the edges don't need to be finished. This works fine, but it does like to ride up. It would be nicer if the bottom were a bit longer. As it is, it tends to want to make a sort of weird line right across the front of her bust. If I get around to it, I will add another piece of stretch fabric to the bottom that will help pull it down and anchor it under the bust, or that could be pinned to a bra if desired.
The dress is finished with a red sash (leftover from the bathrobe I cut up here. I pinned it to one side, and tied it loosely around the waist.
I found a round jewel piece in the clearance area of a craft store. I covered the center with a scrap of fabric that matched the sash, and hot glued some fake pearls around the edge. I then pinned it to the front of the dress.

This is the finished dress (once again . . wordpress will not let me crop pictures. Go figure):


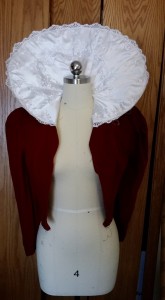
THE CAPE:
So . . . there are some good things about how I made this cape . . . and there are some not-so-good things. Part of it definitely is in the "how-NOT-to-do-something" category.
I knew that I wanted a large white collar. I found a pattern for a Queen of Hearts dress that had a large stand up collar. It split in the back, but I thought it would give me a starting shape and the neck line. I laid it on a piece of folded newspaper, and drew out about what I thought would be the shape I'd want.

The neck hole was OK:

But I didn't like it on the dress form:

So I taped the cut off newspaper back on, and made the back a bit rounder and taller. I adjusted the shape until I liked it.
I knew I'd need something to stiffen it. Interfacing is an obvious choice, but I didn't have any of the really nice stiff stuff (you know, the $10/yd stuff). I DID have a piece of clearance needlepoint fabric I'd bought as a possibility when I was making a French Hood.

I lay the newspaper pattern on and cut it out.
I then cut the backing out of white felt. I added a seam allowance to the inner neck. I ran a row of stay stitching around the outer edge to hold it together. For the inside neck, I figured I could always trim fabric out, but I could never add it back in. In retrospect, a slightly larger neck hole might have helped the collar stand up. It seems counter-intuitive, but the collar wants to fold down onto itself at the neckline.

I went searching for something to make the top of the collar and I found a wedding dress with a wonderful scalloped lace train. I know that there are probably some readers gasping that I would cut this up to do this. Here are my thoughts: I purchase these garments FOR the purpose of upcycling. If, when the time comes I won't do it . . then I can't buy any more. I also KNOW the shows that I will most likely be costuming in the near future . . .and none need period gowns. I purchased some of these wedding dresses with the intention of trying to dye them and experimenting that way . . hasn't happened. Besides which . . what are the odds of making a gown that needs the whole train intact? Not much.

I experimented laying the collar shape on the skirt until I seemed to find the best "fit" around the edge.

While the fabric was still attached to the dress, I carefully pinned the lace edge around the edge of the collar, cutting the lace apart where needed.
Once that was done, I cut across the bottom, trying to make sure I left enough extra for finishing the collar, without cutting out huge amounts extra from the train (because who knows what I might want to use it for next). I then folded, pressed and pinned the fabric down into "logical" pleats.

Then I stitched the pleats down. I basted around what would be the stitching line (about the edge of the needlepoint canvas) in the neckline and trimmed out the extra fabric. I had considered cutting out additional lace appliques and sewing them on, but, I decided not to for this project.

This is not the world's stiffest collar. It might have benefited from a few pieces of boning. If at some point I decide I want to add that, I can sew a channel next to one of the existing stitching lines, snip the felt, insert the boning, and hot glue the slit shut. I think the needlepoint canvas will get floppy over time. However, it was cheap, and it works well enough.
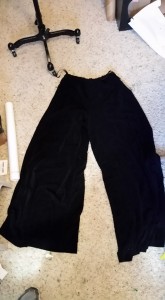
I had found a pair of evening pants I thought would work for the cape. They were full, without side seams. The fabric was a black stretch knit with some silver glitter. I liked the way it draped, and liked the little bit of sparkle.

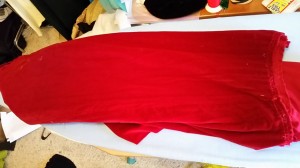
My daughter had seen a red velvet lined cape and was hoping for that. I knew I would need something fairly stiff to support the collar so I tried starting with this red velveteen dress:


The skirt was fairly straight, and I was hoping it would be straight enough that I could turn it sideways and use if for the cape lining the long way. Unfortunately, when I took it off, the pieces had a slight gore to them. I could have taken them apart and resewn them. However, the velveteen was very heavy. I struggled with how I would attach the heavy lining to the stretchy black and make it work. I also was concerned about the weight of the cape. I tabled that problem for the time being.
My lovely piece of red velveteen from the skirt:
I still went ahead and used the top for the base of the cape. After taking the skirt off (above), I removed the back zipper. I experimented on my dress form with how to best use the top to make the base of my cape. I ended up thinking I could flip it backwards and inside out . . that way the nice red velveteen would be on the inside facing out for a nice lining (I was still hoping to line the bottom of the cape):


I pinned the collar to the neckline, matching center backs . . as long as those matched I could mess with the front . . . and sewed the collar on. I clipped the inside collar seam allowance to help it go around the curve.

When I was done . . . I had somehow (old habits die hard), sewed the collar on BACKWARDS to what I wanted and the right side of the bodice was out. I was getting tired . . I decided I didn't care, and left it.
I messed around manipulating the collar to figure out how to make it stand up best. I found out that by folding under the front corners that gave a lot of lift to the back. I just pinned this down for the time being.

I knew I only wanted the cape to cover the top front of the outfit. I also knew I needed to keep the shoulder area of the original dress as that is what would give stability to the cape and keep it from pulling backwards (and hanging off the neck), I just made a general cut across the front, making sure to leave plenty of extra for trimming. I started several inches below where the collar attached and angled towards the bottom of the armscye.
Once one side was done, I used that as the pattern for the other side.
Then I carefully smoothed the one sleeve flat and cut it off; repeated with the second.

Between the full sleeves, the opening of the front AND the bodice fullness moved to the back, there was a bunch of extra fabric. I pleated that up and sewed in some darts to help shape the project.
It looked like this now:

I think at this point I got really frustrated (and tired, I was running out of time and still fighting the mind-sucking virus) and I quit taking pictures.
I thought long and hard about changing this to a short red cape. It would have been easy to trim and hem the front edge and attach a section of the skirt to make a short red cape. BUT, that isn't what the Evil Queen wears.
In the meantime, I took the evening pants apart. They did not have side seams, so I cut out the inside leg seam and the crotch seam, and I had two rectangular-ish pieces of fabric. Because it was stretchy, I was able to drape one around the top, and it snugged in nicely around the shoulders. I then made the final decision that I liked the drape of that fabric MORE than I would like a red lining. I also wanted it a bit longer, so I sewed the second leg on to the bottom of the first leg (at a logical place given that maximized the width, given that the pants flared toward the bottom). You can see this seam–but it is not disturbing.
Cape back:

The seam in the back is visible right above the green hose in the yard. I left the bottom hem of the pants intact, and just sewed it to the second leg. I trimmed the sides so they were mostly even (it is the bottom of a stretchy cape . . who looks?) The edges did not need to be finished since it is a stretch knit.
I then sewed the black cape down in strategic places to keep the shape I wanted. I trimmed out excess fabric. I folded up the front of the red cape lining and shaped it to the black overlay and sewed them together. I added a piece of velcro to close the cape. I also stitched the collar down in the front to attach it to the cape and help it keep the upright shaping.
The cape was done, and you can see pictures of the finished product below. This is not a shiny example of how to do this, but it was functional, so that is all I cared at this point. Using the dress bodice as the support for the collar and cape was a decent idea. I did not need to use red–black would probably have been better. I suspect I may have been able to save time had I pulled out a cape pattern and used that for the top. Intellectually I KNEW that the red for the lining and the black for the cape were incompatible as the fabrics were so different, but, it took me a bit to overcome that bit of knowledge and go on.
As an aside: making a full length cape from thrift store clothes is very difficult. Unless you are very short, once you cut the skirt off a dress, you have lost critical length. If the dress is gored to the waist, the amount of fabric in the waist will typically be less than needed to go around shoulders. If you are so fortunate as to find matching dresses, that will help as you can combine the two skirts for WIDTH, but not really for length, especially if the skirt has an flare (bias cut) at all. Another option is to make a layered cape with a capelet, or some other fitted fabric over the shoulders, to which you can attach the cape fabric to give it some extra help with the length. However, if you want to make a full length cape, I would suggest turning to bed linens or drapes.
THE HOOD:
The black hood I actually took no pictures of making as it was straight off-the-pattern sewing. I had a pattern for a cat/lion costume in an adult size. I cut the pattern out of the black stretch velour from the skirt, and sewed it according to the package directions. I then shaped it a little bit to make it a bit smaller. It had a point in the front already on the pattern. I just bonded a second piece of fabric to the back to give it a little stiffness (the hood was supposed to be lined, I didn't).
THE CROWN:
The crown I made by looking at images of the Evil Queen and drafting a pattern on newspaper.

It took me a couple of times to get a shape that I liked. Once I had the pattern, I cut it out of white felt (the color I had).

I initially sewed black non-fraying velveteen upholstery fabric to the crown shape and decorated that with a holographic iron on gold. I hated it and every thing I tried to do to make it "better" looked stupid.
In the end, I completely covered it in scraps of gold glitter heat-press that I have from my screenprinter friend. They bond to each other, and I just cut small pieces until the entire crown was covered. I attached velcro to the back for an adjustable fit.
COMBINED COSTUME:


The cost: Purple dress (main) $6, purple dress for sleeves $4, red dress: $0.25, white fur $2ish (I needed three 3″ strips), pin: $1.29, sash: scraps, black evening pants: $0.50, Needlepoint net: $1.49, wedding dress $25 (but I only used a small portion of the train), white felt: recycled from a different project, gold glitter: recycled scraps.
Time: about 8 hours for the entire outfit. The dress went smoothly. The sleeves could have been more efficiently done if I hadn't tried to "save" time. The collar was time-consuming using the wedding dress. Another layer of felt or a solid shiny fabric on top would have been much quicker. The collar is a bit large. I'd probably make it smaller if I were doing it again. The cape was more time-consuming than it should have been. The crown went quickly, except that I covered it in glitter stuff twice since I didn't like the first version. The hood was quick (it is just pinned shut as my daughter didn't like it, so it was only worn for the pictures).
I hope this gives you some good ideas. I love to read feedback and comments! You can follow me here, or on Facebook "Costumecrazed"
gellatlysteranded.blogspot.com
Source: https://costumecrazed.me/2015/10/16/upcycle-the-evil-queen-from-snow-white/